Showing posts with label Blue Fern Studios. Show all posts

Tuesday, June 20, 2017

Blue Fern Projects for May

Hello Blue Fern Studios and paper friends. 

This is my last month on the Desin Team and it's been a great time. I would like to thank Blue Fern Studios for giving me this wonderful opportunity and their great support. 

For this month I have made a canvas and 2 layouts. 
For the canvas I used the Happy Accident  Collection and for the 2 layouts the brand new beautiful Garden Life Collection

Let's get started!

Canvas 


I started of with painting the sides of the canvas with some acrylic, with a second dry-brush coat in blue. Once this was dry I used the Tattered News Print Stamp randomly for some effect. 
The front of the canvas I covered with Happy Accident : Fluke with on top a smaller piece from the same sheet, distressed at the edges. Again I used the Tattered News Print Stamp for some details around the canvas and used a stencil with Graphite paste to create texture.


The Blue Fern Studios chipboard pieces Stick Stacks are embossed with Starry Night to pick up the beautiful light blue from the paper. Having done my preparations it's time to start my layers.


Happy Accident is the first collection to have it's own accompanying Printed Chipboard Shapes sheet and it makes for a wonderful way to add layers, features and titles to your projects. For my canvas I made great use of them.


Also adding ribbon, lace, netting and thread to the mix before finishing off the project with the gorgeous Chesterville Florals and Blooms.


Paper
Happy Accident : Fluke
Chipboard
Stick Stacks
Happy Accident : Printed Chipboard Shapes
BFS Embossing
Starry Night
Stamps
Tattered Newsprint
Flowers
Chesterville Florals 
Chesterville Blooms

The End of a Perfect Day


At the end of May we had a great trip to Disneyworld it had been quite a while since the last time we had been there, but no matter what age, it's always great. Even Tinkerbell joined in for fun!

For this layout I used the brand new Garden Life Collection. The Felicity page for the background and Calling Cards pieces for layering. For the background work I used the Tattered News Print and the Tattered Harlequin stamp, a stencil and mists.


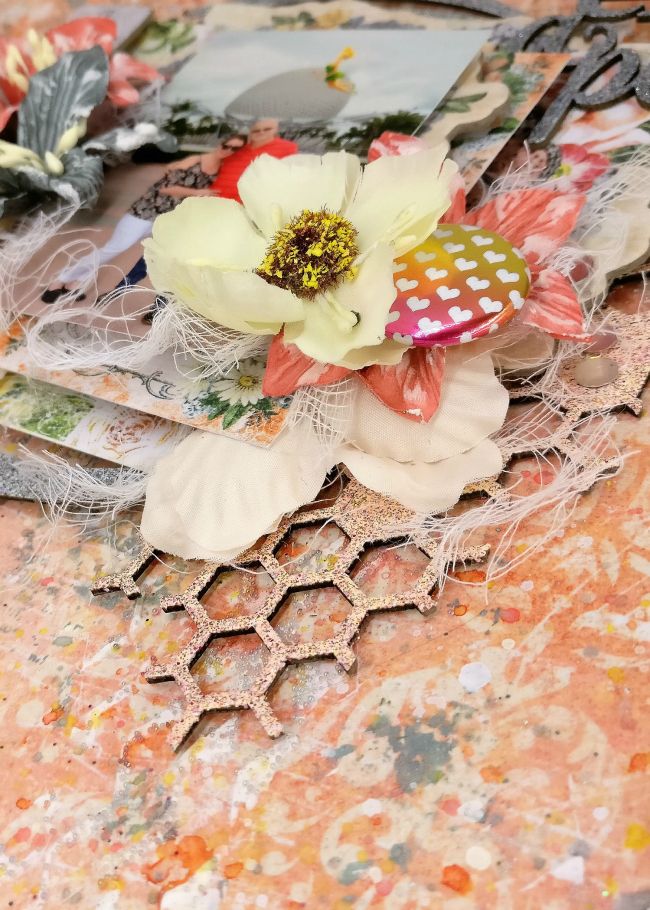
The Honey Bits chipboard pieces are embossed with a mixture of a few embossing powders. Sunlight Rose, Morning Sun, Pink Dust & Copper.
The other chipboard pieces, Graduated Circles, Perfect Day, Roman Clock were first embossed with Sand & Sea with a second coat of Iridescent Grey giving it a beautiful sparkle.


Now that we have prepared all the parts it's time to put the layout together. Stacking the pieces of  embossed chipboard, Garden Life - Printed Chipboard Shapes, pieces of paper and the beautiful Blue Fern Studios flowers, Garden Florals, Harvest Lilies & Chesterville Blooms


Paper
Garden Life : Felicity, Calling Cards
Chipboard
Perfect Day
Bits of Honey
Graduated Circles
Roman clock set Small
Garden Life : Printed Chipboard Shapes
BFS Embossing
Sunlight Rose
Morning Sun
Pink Dust
Copper
Sand & Sea
Iridescent Grey
Stamps
Tattered Harlequin
Tattered News Print
Flowers 
Garden Florals
Harvest Lilies
Chesterville Blooms


Disneyworld


On one of the evenings in Disneyworld we so enjoyed the fireworks. What a show they put on. The castle has this spectacular light show and with the fabulous music it's just perfect.

For this photo I chose the Garden Life : Calling Cards sheet as the base of my layout. To continue on the fireworks I used the Christmas Collage Stamp and used it with a silver ink and Antique Gold Embossing Powder. A large diamond stencil with a mixture of gold & silver paste and some white gesso to give the background texture. 


The Floral Lattice Bits were first embossed with Sand & Sea Embossing Powder and a second layer with Iridescent Grey. The Seeing Stars and Disneyworld chipboard pieces first got a Antique Gold coat with embossing powder and then a second layer with Goldenrod Glitter.


Having prepared all the pieces I postioned them on the page where I wanted them and layered everything. Adding embellishments and Blue Fern Studios flowers Spring Florals and Garden Blooms. As finishing touches I splattered a variety of mists.


Paper
Garden Life : Calling Cards
Chipboard
Seeing Starts
Disneyworld
Floral Lattice Bits
BFS Embossing
Sand & Sea
Iridescent Grey
Antique Gold
Glitter
Goldenrod
Stamps
Christmas Collage
Flowers 
Spring Florals
Garden Blooms

It's been an absolute honor to work for this wonderful company.  
I hope I've managed to inspired you 
See you around the world!

Happy travels!

Lydia

Friday, April 28, 2017

Blue Fern Studios - Happy Accident - Free

Hello Paper and Blue Fern Studios friends. 

We're so happy with the new Happy Accident Collection and brand new introduction of the  Happy Accident Printed Chipboard Pieces that I'm sharing an extra post with you this month.

For this layout I'm using a photo of my niece's little boy visiting a WWII memorial with his Granddad, which is very fitting for this time of the year when many countries have their own remembrance days. It's so important to teach our children their history. 

- Free -


I'm using the Happy Accident - Incident sheet as the base. For my background I chose the Texture Circles Stamp and embossed some of the prints with Snow Embossing powder and others I did in black ink. Some extra stamping with the  London Chronicle Stamp. After that I got out a stencil and created some texture over the page with some paste.


The Abstract Wire Frame got embossed with Stormy Skies. A beautiful new metallic blue color embossing powder. The Rose Wreath chipboard  was cut in a couple of pieces and embossed with Rusty Rose. I sprinkled some of the Pea Soup Glitter over the leafy parts of the Rose Wreath and heat set it.


Having done all the preparation work I was now ready to start putting my layout together. All these chipboard pieces make for some wonderful layers.


Adding Chesterville Blooms and other flowers to decorate. Some final ink splatters and we're all done. I hope you will have fun with this collection!


Paper
Happy Accident : Accident
Chipboard
Printed Chipboard, Abstract Wire Frame, Rose Wreath
Embossing Powder 
Snow,  Rusty Rose, Stormy Skies
Glitter
Pea Soup
Stamps
London Chronicle, Texture Circles
Flowers 
Chesterville Blooms

Thank you so much for having a look!

Hugs
Lydia Guijt


Tuesday, April 18, 2017

Blue Fern Studio projects for April!

Hello Blue Fern Studios and Paper Friends.

This month I have 3 very different layouts for you.
Two of them are with the beautiful Spring Parade Collection and the third one is with one of my favorite collections Chesterville

Discover


When we took this tour through the Grand Canyon this Sunset was just amazing. I knew I had to scrapbook it!
I'm using the Market Place paper as my base. The Tattered News Print Stamp right now is one of my favorite stamps and for this layout and all the others I used it to create some background interest. I chose one of my stencils and used paste to add more background details.


I wanted to use some straws for this layout to create a dramatic black/white and green effect. The Turkish Bits pieces and Discover were embossed with Ebony embossing powder. 


The Layering Stems with Sea Mist embossing powder and topped with a layer of Caribbean Glitter. 


Behind my photo I put some smaller pieces from Spring Parade - Market Place and Sunday Best to create some layers. The straws already created some depth and helped with a nicely layered look. 


The beautiful Peony flower (Spring Peony and Berries) is quite big and is perfect to take apart and use in parts. Filling up the rest of the layout with some more flowers and embellishments.


Paper
Spring Parade : Market Place, Sunday Best
Chipboard
Turkish Bits, Layering Stems, Journey, Explore, Discover
Embossing Powder 
Sea Mist, Ebony
Glitter
Caribbean
Stamps
Tattered News Print
Flowers 
Spring Peony and Berries
  
Memories


For my second layout I'm going a little more classic. The base is Spring Parade - Sun Rise. Although in the corner it has an Easter theme. By covering it up. You can make it into whatever you chose it to be. I found the saying on Attic Charm - Calling Cards and went from there.


For the background I used the Tattered News Print Stamp to create interest around the page with Antique Gold Embossing Powder.


The Blooming Curls,  Whimsy Flourishes and Leafy Page Accents chipboard pieces all got embossed with Oatmeal embossing powder with the flowers on the Blooming Curls piece in Pink Dust.


I positioned all the pieces and started adding a variety of Blue Fern Studios flowers, Spring Florals, Soft Blossoms, Late Winter Lilies, together with some pieces of lace, ribbon and other embellishments. Some finishing touches with pearls, art stones and beads.


Paper
Spring Parade : Sun Rise 
Attic Charm : Calling Cards
Chipboard
Blooming Curls, Whimsy Flourishes, Leafy Page Accents
Embossing Powder 
Antique Gold, Pink Dust, Oatmeal
Stamps
Tattered News Print
Flowers 
Spring Florals, Soft Blossoms, Late Winter Lilies

Journey


My third and last layout for this month is a more masculine layout using the Chesterville collection.
This collection is just perfect for layouts like this.


I used Chesterville - Keswick as the base and started preparing my page with clear gesso. Then used the Tattered News Print stamp around the page. Next I got out 2 stencils and a combination of pastes to create some interest. Since I'm going for a metallic look. I used gold, silver and graphite. Continuing with splatter inks. Now that the background is all done it's time to get the chipboard pieces prepared. 


Circuitry and Discovery are embossed in Sand and Sea with a sprinkle of  Antique Gold here and there. The Faucets in Black Sand. Putting it all together on the page creating some layers with Chesterville : Keswick, Chester pieces. Some flowers from the Chesterville Blooms, Harvest Lilies and other embellishments to complete the look. 


Paper
Chesterville : Keswick, Chester, 
Chipboard
Circuitry, Faucets, Journey, Explore, Discover
Embossing Powder 
Black Sand, Antique Gold, Sand and Sea
Stamps
Tattered News Print
Flowers 
Chesterville Blooms, Harvest Lilies

I hope you liked the 3 completely different styles this month I created for you.
Looking forward to showing you more next month. 

Thank you for stopping by today!
Have a great day!

Lydia 


Tuesday, March 21, 2017

March projects for Lydia Guijt

Hello Blue Fern Studios friends! 
Lydia Guijt here again with some new creations for March.
My first layout will be accompanied with a tutorial. You'll find that below.

For my second feature I've made something completely different. I hope you'll like it.

Memories


The new Spring Parade Collection has a beautiful color combination. For this layout I chose the Susie's Garden sheet.
 For my background I started off using the Tattered Harlequin stamp for embossing and the Tattered News Print stamp for inking. After this I used a stencil and paste. After the background work is done I prepared the chipboard pieces. 


Crossing the Lines with Speckled Mint and some Peacock Feathers. Wild Field Stem with Lavender Eggs on the flower part and Verdant with some sprinkling of Antique Gold. The same process for the Leafy Twigs. The title Memories - Chunky Words Halftone was done in Pink Dust. Once that was all done it was time to assemble the layout. I used the new Spring Peonies and Late Winter Lilies in my flower cluster. To finish off the page I added some further touches. 


Below you'll find the video with the whole process of making this layout. 
Enjoy!


Paper
Spring Parade - Susie's Garden
Chipboard
Crossing the Lines
Wild Filed Stem
Chunky Words Halftone
Leavy Twigs
BFS Embossing Powder 
Pink Dust
Speckled Mint
Lavender Eggs
Verdant
Antique Gold
Glitter
Peacock Feathers
Stamps
Tattered News Print
Tattered Harlequin
Flowers 
Spring Peony and Berries
Late Winter Lilies

Follow your Heart


For my second project I wanted to do something different. 
Our Blue Fern Studios Chipboard is so nice and sturdy, it's perfect to use for Mixed Media projects.
I got a double sided canvas and tore out the center to open it up. I used pastes and stencils to created textures on the outside and center part. Once it was all dry I started with the Shabby Bits Bricks Chipboard pieces as the bast to build the center part on.


Using other materials like cardboard and metal embellishments stacking and tucking in and under to create interest and textures. On one of the top layers a couple of Leafy Page Accents. Around the edges I used the Note book Edges and having the Layering Stems fall over the edges.


With all the items in place and stuck down it was time to paint everything with black gesso. Once that was all dry it's time paint on all the the accents. The Follow your Heart title was first embossed and further highlighted with some acrylics and pastes.


Chipboard
Notebook Edges
Shabby Brick Bits
Layering Stems
Leafy Page Accents
Follow your Heart

Embossing Powder
Antique Gold


Spring Greetings


For the last project this month I decided to make a set of cards using the new Spring Parade collection.


I started of with cutting different sizes of paper and played around with them creating a layered look. Once it was right I started filling it in with some doilies and some lace. For the Easter card I used one of the Easter Egg Ornaments and embossed it with Lavender Egg. Giving it some extra glitter with Peacock Feathers. The Spring card has a Spring Trinkets chipboard piece and is treated the same way. 


To finish off the cards I used Later Winter Lilies and Soft Blossoms and some other decorations. The final touches were some mist splatters and we're all done with our card set.


Paper
Spring Parade -  Susie's Garden, Market Place, Spring Petites
Chipboard
Easter Egg Ornaments
Spring Trinkets
BFS Embossing Powder 
Lavender Eggs
Glitter
Peacock Feathers
Flowers 
Soft Blossoms
Late Winter Lilies


Thank you so much visiting the blog and looking at my projects! 

Hope to see you again next month!

Lydia


Tuesday, February 21, 2017

Blue Fern Studios - February Projects

 Hello Blue Fern Studios friends. 
It's Lydia here today showing you my 3 projects for February. 
So excited to be using the soon to be released Chesterville Collection. The first 2 layouts are made withe that and the third with the Serendipity Collection. Here goes!

Capture the Moment


For my back ground work I started off with using the Postal Textures Stamp and Antique Gold Embossing Powder to create some interest. After that I followed with a stencil and paste. 
The Swirly Doodle and Swirly Circle Chipboard pieces I embossed with Black Sand BFS Embossing Powder and the Roman Clock Set and Captured Words with Copper BFS Embossing Powder.

Once I had all the preparations done it was time to start layering. Adding Late Winter Lilies and other embellishments to get the layout together. Some finishing touches with some mists and ink splatters and we're done with the first one.


Paper
Chesterville : Bretton - Holmes
Chipboard 
Swirly Doodle
Swirly Circle
Roman Clock Set - Small
Captured words
BFS Embossing Powder 
Black Sand
Copper
Antique Gold
Stamps
Postal Textures
Flowers 
Late Winter Lilies

Explore


For my second layout with the Chestervile collection I used another picture from our trip to the Grand Canyon. The mountains fit perfectly with the colors of these papers. To make things pop I decided to go with a contrasting color. I had my eye on the gorgeous Peacock BFS Embossing Powder for the Manchester Frame. Working my way back to all the other accents with that.


For my background I used the stamp and embossing technique again. Going with the Scratched stamp and Antique Gold BFS Embossing Powder. Followed by a stencil and paste, some misting and ink splatters. 


The Notebook Edges chipboard piece I embossed with Black Sand BFS Embossing Powder. The Seasonal Wild Flowers and Journey, Explore, Discover chipboard pieces with Oatmeal BFS Embossing Powder. Adding Autumn Glitter to the tips. With this all prepared I cut some pieces of paper from the Chester and Holmes papers to create some layers adding the chipboard pieces and Dark Tropic Lilies and other embellishments to finish of the layout. A final touch of ink splatters and we're done. 


Paper
Chesterville : George - Chester - Holmes
Chipboard
Manchester Frame 
Seasonal Wild Flowers
Journey, Explore, Discover
Notebook Edges
Embossing Powder 
Black Sand
Oatmeal
Peacock
Antique Gold
Glitter
Autumn
Stamps
Scratched
Flowers 
Dark Tropic Lilies


Memories Captures


For my last layout this month I chose the brighter color scheme of the Serendipity Collection. Getting ready for Spring this part of the world. 


For the back ground I started with stamping around the page with a combination of stamps, Postal Textures, Christmas Collage & Shabby Edges. Followed by a stencil using an assortment of pastes. The gorgeous Janie's Frame chipboard piece was embossed with Oatmeal BFS Embossing Powder. After it was done I cut it through half to position on either side of the page. 


I fuzzy cut some pieces from the Merriment sheet to use on the layout and several butterflies. Assembling it all I used an assortment of BFS Flowers : Dark Tropc Lilies, Soft Blossoms & Courtship Roses. Adding some final touches with some Burnt Copper & Sunshine Glitter for a bit of extra sparkle and we're done.


Paper
Serendipity: Glee - Merriment
Chipboard 
Janie's Frame
Captured Words
Embossing Powder 
Oatmeal
Glitter 
Burnt Copper
Sunshine
Stamps
Postal Textures
Christmas Collage
Shabby Edges
Flowers 
Dark Tropic Lilies
Soft Blossoms
Courtship Roses

Thank you so much for checking in!
Hugs, 
Lydia Guijt