Wednesday, February 10, 2016

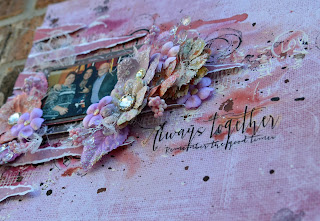
Always Together


Hello Paper friends!
I've been playing around with some splattering and misting techniques. 13@rts papers are perfect for this since they are nice and sturdy. I started of with covering both sides with clear gesso. 


Then I used the stencil from 13@rts with all the sentiments and applied gesso in a triangle direction. I have to admit. I watched Keren Tamir earlier in the week and she did a layout that way and it was very striking. So I started off that way. After leting it dry, I sprayed the page with some water and my first color of mist here and there and let is drip. Dry-set it with the heat gun and on with the next colors.


I used stamps and lids to add some circular shapes to the background with white and black splatter ink. Once I was happy with the background I added strips of mesh tape. 


I tore some small strips and glued them on wooden sticks to be able to give lift them up from the page. It's time to place the photo, under it I put some of the cheesecloth.


For the flowers I choose the Prima Royal Menagerie collections. It had all the colors that the mists created on the paper, and with the extra bling on it I felt it gave it a little bit more zing. 
I also added a few crystals.  


All we have to do now is add our title and we're done. For that I chose a sticker from the 13@rts Secret Letter collection. I cut around it so you didn't see the whole plastic square.

For the final touches some extra splatters with the Splash Water Inks. 

Thank you for looking!


Used products:
13@rts Stencil
Prima - Royal Menagerie - Flowers Anne
Prima - Royal Menagerie - Flowers Maud
Crystal Embellishment
Mesh - Cheesecloth
Liquitex Clear Gesso

Tuesday, February 9, 2016

Flying Unicorn BAP - Best Friends


Flying Unicorn BAP 
Best Friends

Today I'm back with a tutorial on how I put this layout together. 


On the picture below it shows the products I used. The 12x12 papers are from this months gorgeous February Main Kit - Your Passion Your Art. The flowers are from the various kits as are 2 of the stamps. The Prima 6x6 pad is a preview of the new Tales of You & Me line. I was lucky to see all of the new lines at Prima's Art Venture. This line matches perfectly with the colors of the Newport papers from Riddersholm. The Chippies are from Creative Embellishment and came from my stash.


I started with these 2 papers as my base.


I tore a wide strip of the wood looking paper and stuck it one the left hand side. With the February Main Kit - Your Passion Your Art and the February Mixed Art Kit - Your Passion Your Art we got 2 Prima stamps, I picked a third one from my collection and with brown Stazon stamped in a certain areas with the different stamps to create a background. Most will be covered up again, But here and there it will pop out. 

If you've seen any of my layouts you know I love layering, so I cut some strips and used one of the Prima paintable 4x6 cards from the kit, I always back my pieces of paper with some extra to give it that extra thickness. Let the layering begin. Doesn't that new Prima-Tales of You & Me look awesome with the Riddersholm-Newport paper.


I used one of the papers with the Prima Metal Die - Parisien Lace for some extra detail.


Time to add the photo!

Time to add the flowers and leaves, which were cut with the Prima Metal Die - Leaves-Large.
The Chipboard flourishes are from Creative Embellishments from my stash. I first put gesso on them. Not to precise. After it dried I used one of the stamps with Stazon and randomly stamped over it. 
I tucked one on the left lower corner and one at the right top corner. The title was from last months kit.

Some Brown 13@rts Mist & White Splash Water-Ink as a last detail around the page and we're all done.


Below is the whole tutorial in a video, I hope you'll enjoy watching it.  


Thank you for watching!

Below is a list of used items:

Prima - 6x6 Tales of You & Me


Wednesday, February 3, 2016

More than Words Challenge - Wonderful & Sparkle - Life is Good!


Here is my creation for the More than Words Challenge. Using the Wonderful & Sparkle guidelines was not that hard to do. when we take a trip to Las Vegas we always have a wonderful time. Plenty of inspiration there. 
Thank you to More Than Words for the Feature!!


Tuesday, February 2, 2016

FUL - Smal Arts - Hello!


Hello Paper friends!

Today I'm revealing the project I made with the February Small Art Big Passion Kit - Your Passion Your Art. Among all the goodies you'll find a Darice butterfly Metal Die, a cute 6x6 paper pad from Sherri Baldy. A chippie and a backboard chippie, so that immediatly got me thinking. I started with painting the backboard using the 13@rts glitter splash ink. After it dried I decorated it with a Stazon and the stamp that came with the kit. After that I chose one of my Prima Doily Stencils to add some Gesso for more detail.
I used a Prima box that always comes with wooden elements to create the little awning. Cut a little piece of and covered it with paper.


Time to decorate the little awning with flowers, some ribbon and a clock. I used the Darice Metal Die to make the little butterfly. For the body I put some bling on it. 


Under the awning I made a little calander/photobook. 


I used the wooden keys to make it easier to flip the pages. It's a nice little detail. This Small arts kit has a lot of nice papers and parts to play with.


Another close-up.


It was a lot of fun making this project.

Thank you for looking!

Below is list of products I used:

February Small Art Your Passion kit
February Mixed Passion Kit
February Mixed Art Kit
Flowers from my stash
Scrapiniec - Laser cuts
Prima Doily Stencil from a previous kit.


Monday, February 1, 2016

FUL-February-Cherish!


Hello paper friends!
This months Flying Unicorn Your Passion Your Art Kits are stunning. In this post I'm sharing with you the second layout I've made with it. 


For the layering I've used a lot of the extra pieces we got in the Flying Unicorn Main & Small Arts Kit.  From one of the sheets of the paper I cut 2 doilies with the Prima Metal Die Crochet Doily part of that same sheet has flowers which I had fuzzie cut. 
    

 The Resin Clock I sprayed with the Brown 13 @rts Ink in the kit and blended it with the blue Prima Color Bloom, The frame I just kept as it was. The chippies are 2Crafty. A nice flourish in a 4 pack, very delicate. I put gesso on it first and after it was dry I used the raspberry metallic 13@rts paint on a stamp to give it a little detail.


Time to start assembling my flower groupings and adding the chipboard flourishes to it with some other embellishments.


The lace Prima flower adds an extra detail to the flower. This paper had some gorgeous butterflies. I cut some out and added them to the layout.


A couple more close-ups.


and the last one!


Below a list of used products:


Thank you for looking!

Have a wonderful scrappy day!


Sunday, January 31, 2016

FUL-SA-Love Life - Just for You!


Hello friends!

Hope you're still enjoying the kit this month. There is so much gorgeousness we can make with these papers. Riddersholm Design papers are off a beautiful quality.

For the Flying Unicorn - Small Arts Kit I made 2 different cards.
 While at Prima-Art Venture we had the pleasure of getting taught a class by Frank Garcia. He has a great technique to work with shells and I'll outline the process below.

Get your assortment of shells and give them a dry coat of gesso. Don't over paint them. It will take too long to dry, and you also don't want to loose the colors complete of your shell. Let dry.
The second step is to paint your shells with Tim Holtz Distress Crackle paint - Clear rock candy. It's best to let this dry on its own and it will create a wonderful crackle. 
When completely dry it's time to use Frank Garcia's new Artisan Powders. They're new and I have no doubt Alda will bring them in the store soon. They come in 3 colors. I used the black and umber. With a brush you mix both colors over your shell and when you think it's enough you polish your shell, The powder highlights the cracks. Giving it a diamond like effect. 


After finishing the preparation on the shells I was ready to start with the card. The Riddersholm Design papers Newport have a nautical theme so quite fitting don't you think. The card itself is not that difficult. Besides the base I cut a mat. The kit also included 2 pieces of watercolor paper. I sprayed some Color blooms we got with the kit on my crafting mat, used one of the small Stamps to spread a controlled splatter over that piece of paper. I totally admire those ladies that do all of this splattering out of hand. Most of my splattering I prefer to do a little bit more controlled. For the background I added some 13@rts sand, Now it was time to assemble the flowers and shells. Voila!! The title was colored with the same ink. A classic looking card, with an added bit of something.


For the second card I used the from from one of the Prima-Everyday Vintage Printables. I liked the little bird and wanted it to stand out. From one of the other papers I punched out a strip giving the idea of a banister. 

The flowers from the kit were used to embellish with some added Prima - Floral trim. My favorite metal die to make some leaves a bow ribbon and we have our second card.


 Thank you for looking! 

Below the list of used products: 
Tim Holtz - Distress Crackle Paint - Clear Rock Candy
Prima Gesso
Prima - Color Blooms
Petaloo Flowers